SOMETHING FROM EUREKA SPRINGS ARKANSAS
THE CARNEGIE LIBRARY LEAK
In 1999 an F3 tornado ripped through the Governor's Mansion and MacArthur park Historic Districts in downtown Little Rock, Arkansas, and I became a very busy restoration tech.
actually another tornado I photographed ten years later in Mayflower, Arkansas
It also ripped through non-historic neighborhoods but I didn't work there.
When the dust settled, I ended up in Eureka Springs, Arkansas. I guess my wife decided to spend what money I'd made that year on a Cabin in the Woods.
What happened afterward was that I got used to doing some very interesting and strange jobs; nothing like what I'd done in Little Rock.
Here's one.
When one of the Library Ladies called me about a leak, I met her and saw a huge dark stain on the plaster of the front wall of the Carnegie Library, one of the finest buildings in Eureka Springs. And since Eureka is filled with fine stone buildings, that's saying a lot. Eureka Springs looks like a mix of San Francisco, the Ozark Mountains, and Disneyland. Or maybe it doesn't; you'd have to go there to see. Built around many springs that flow from the Ozark Limestone, it has no streets meeting at right angles, no flat surfaces, and no traffic lights. The Basin Park Hotel has at least eight floors, and each one is a ground floor. That's how steep this town is. It sports about two thousand residents, many of which live out in the County and not in the city. And a city it is, as is evidenced by the fine restaurants and art galleries and the fact that it swells to 60,000 tourists on a big weekend in summer or fall.
But the Carnegie had a major leak and the plaster was stained and disintegrating.
Carnegie Free Library, one of many Andy Carnegie built around the nation
"We don't understand where it comes from!" the Library Ladies chimed.
"Of course you don't, " I soothed . "You're Library Ladies. Your job is to educate and guide. I'm the Old House Doctor. Let me get my stethoscope."
One of the loveliest of the Library Ladies looking disappointed when she found out I was married. Not really, but I wisht it was!
I didn't need a stethoscope; I'd already seen the downspout on the other side of the wall, just outside where the leak was. I surmised it was clogged, and it needed cleaning.
But, but, BUT!
Once I got up on the roof, I found a very different problem for which a solution had to be invented.
This building has interior gutters, or box gutters. That means they can't be seen from the street or down below and are behind the front wood trim. This also means that when they leak, they can to a TON of damage because the water comes through the trim, down the inside walls, and leaves a trail of destruction wherever it goes.
And though I don't remember how I got to the top. I certainly remember what I found.
In addition to the leak, there was a hideous monster living in the downspout.
Then the work started in earnest.
It took some time to cut away all the hardened tar from this downspout flange, and when I did, I discovered that the flange had originally been secured to the steel gutter metal with molten lead, a common practice in the late 1800s and early 1900s. But years of neglect caused water to gather there, likely in a pile of wet leaves. The neglect was undoubtedly caused by the nearly inaccessible roof and the fact that it is a city property. Municipalities don't pay as much attention to these things as private individuals; there are simply too many levels of responsibility, so small things are forgotten.
The water deteriorated the steel on the edges of the lead flange, and hot tar was poured on top of it, sealing it for a short amount of time before separating and allowing water to come underneath, accelerating the rusting process.
After removing the old tar and debris, I came up with a plan to rebuild the gutter/flange connection. The first task was to cut out the rusted sections, which I did with a grinder and cutoff wheel.
To add to the problems, there was silicone spread on the flange above a cast-iron elbow below (the rusted thing below the lead). Cast iron rusts very quickly and silicone is the bane of repair techs. It separates easily and where it sticks it is a bitch to remove.
And then there was the hideous monster living in the hole.
The hideous monster! A vacuum cleaner hose or some such nonsense was siliconed along the flange. Well, at least it restricted water from getting down the downspout. Great plan.
Apparently the building had an erection in 1910. And this before Viagra!
Once the rusted metal and silicone was cut away, I coated all old metal surfaces with silica glycol, a rust preventative and reformer. It actually converts light rust back into inert steel and is an amazing product. Rustoleum sell it as Rust Reformer. I did this to the cast iron elbow below the lead flange, then coated the joint with polyurethane caulk. This type of caulk is so sticky, waterproof, and elastic that even after the library falls down in 300 years there will still be a ring of poly caulk hovering in midair.
The wood that makes up the structure of the gutter was surprisingly intact. There was no reason to remove the lead flange; lead is a Forever element and stays stuck for eternity.
Just before I vacuumed out the debris and coated the wood with an epoxy consolidant to preserve it.
The first section of galvanized sheet steel being installed. It would take a number of pieces, and each would be set in a thick bead of polyurethane caulk, then riveted into original steel where it was intact.
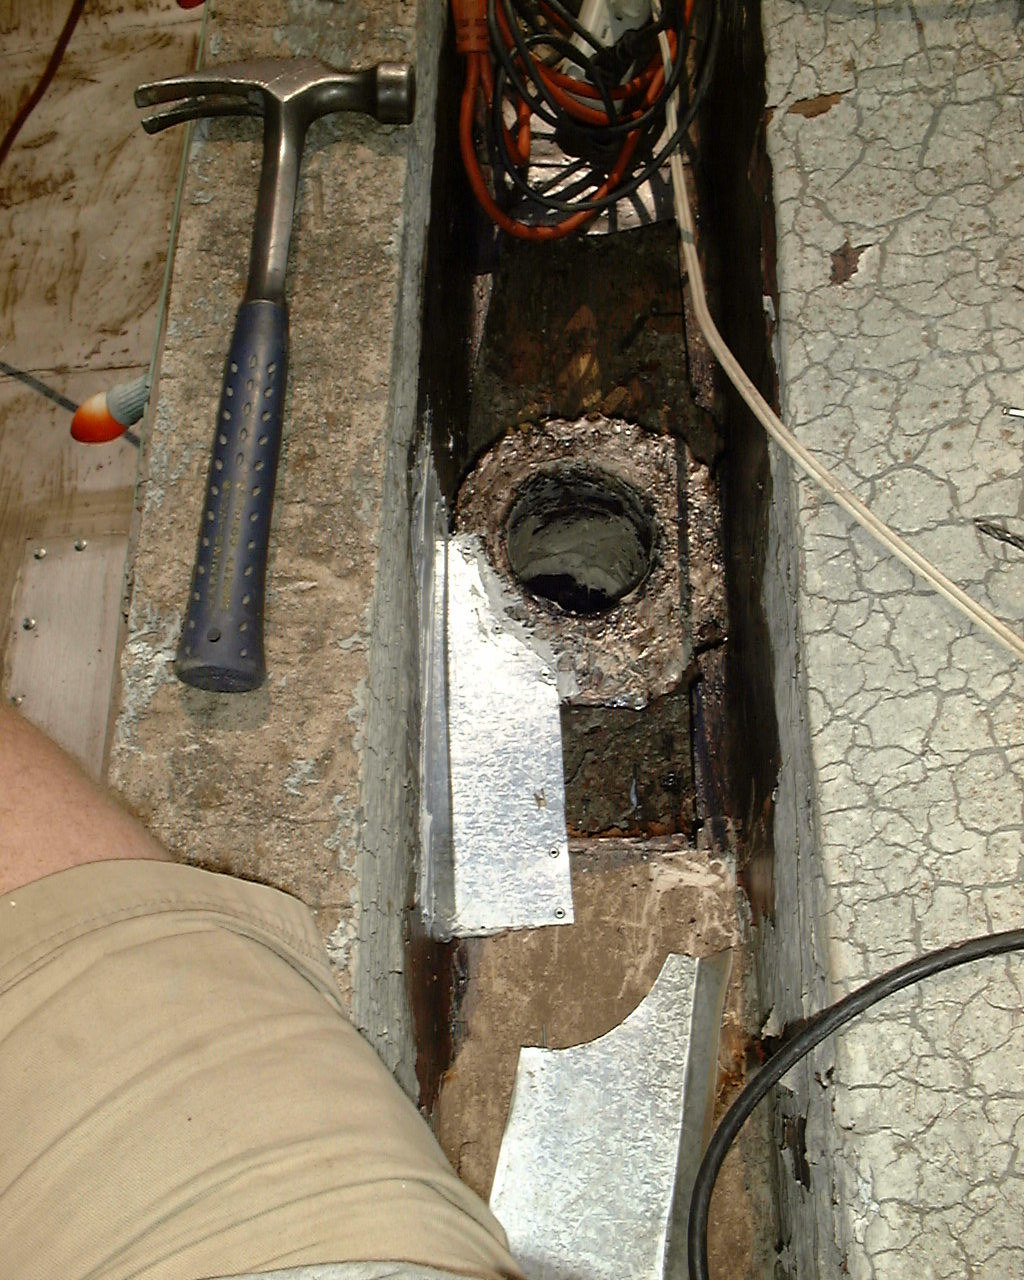
If you look above my knee to the left, you can see a section of original sheet steel on the small parapet below has been removed, then overlaid with new steel. This allowed me to examine the rest of the cast iron downspout below to make sure no other joints were leaking. Once everything proved to be intact, I installed another piece of galvanized sheet steel over it, bedded it in poly caulk, and screwed it down. I used screws instead of rivets in case someone needed to access it in the future. Of course, getting it away from the poly caulk might prove problematic.
I was able to use steel rivets to install the new steel to the gutter bottom, but the sides of the gutter proved to be a problem. The wood frame was too close, and the rivets didn't pull the two pieces together properly. I decided to use steel screws, but the gutter width was simply too narrow to put my drill in position to drive the screws.
But I am made of sterner stuff than that; I cut a small nailset in half, clamped it in a set of Vice-Grips, and somehow managed to tap it with the side of my hammer until it drove through the metal flange and side of the gutter. I brought out a squatty Phillips screwdriver and set the screws, metal, and polyurethane caulk together.
Just call me Dr. Smartypants.
Last piece going in.
My worksite, including tools. Note the lacquer thinner. I use this to clean the polyurethane from surfaces and from my fingers. This caulk will turn your fingers black if you don't remove it before it cures.
Victory! The Library Ladies watched for the next few months and admitted the water leak was gone. I didn't do the interior repair, it was done by someone from the City.
Whaah.
But my efforts were celebrated far and wide with much rousing ha-ha and glib repartee.
Well, at least this library patron was friendly, giving the picture (and my parapet patch) perspective.
Sealing the entire patch with several layers of a thick acrylic waterproofing compound similar to what is used in concrete swimming pools, I topped it with a wire mesh that would keep out the bigger items but allow smaller stuff to flush through. It IS a 4 inch pipe after all, and few people will be up here to clean it, if I don't miss my guess.